Want a comfortable and protective tractor cab without the hefty price tag? Building your own is entirely feasible! This guide provides a step-by-step approach to constructing a durable, cost-effective tractor cab, incorporating tips and tricks gleaned from experienced DIY enthusiasts. Let's get started on your tractor upgrade project! For more detailed plans, check out this helpful resource: tractor cab plans.
Planning Your Home-Built Tractor Cab: From Idea to Blueprint
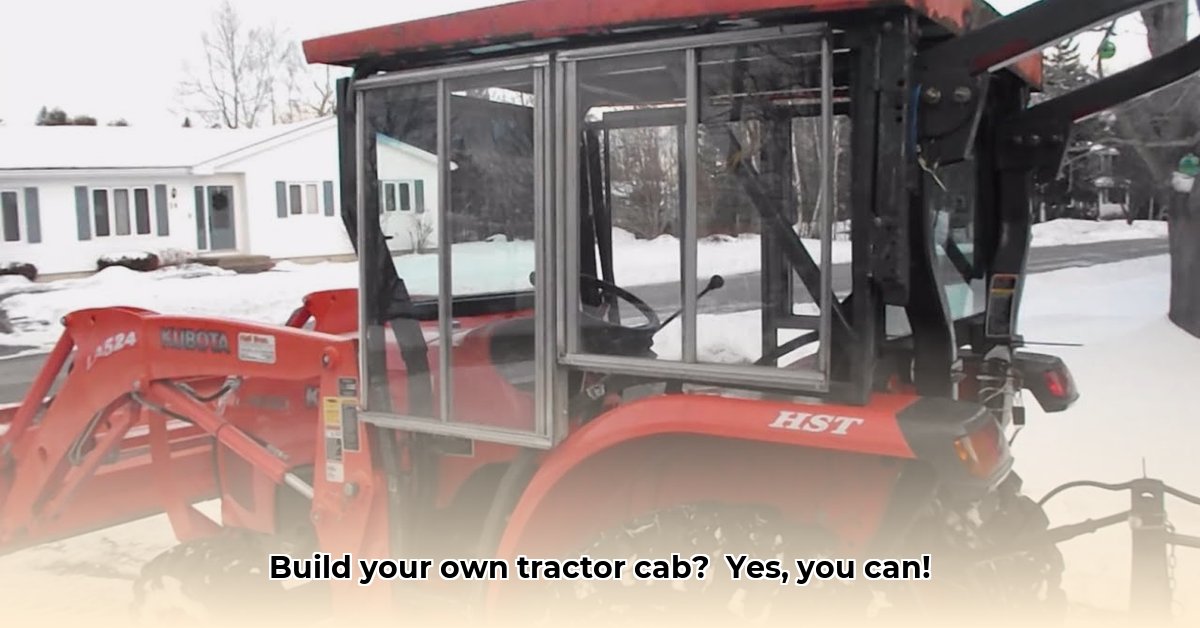
Before you pick up a welding torch, meticulous planning is crucial. Grab your tape measure and head to your tractor. Take precise measurements of its width, length, and height. Consider access to controls and needed headroom. What about climate control? Scorching summers call for ventilation, while frigid winters demand insulation. Sketch your design—even a simple box is a great start. Remember, complex designs require more work but offer greater customization. Don't forget to account for door placement and size for easy entry and exit!
Sourcing Materials: Finding the Best Deals
One major advantage of a DIY cab is the potential for significant cost savings on materials. Explore options beyond the typical retail channels. Used materials are your best friend! Online forums dedicated to farming and DIY projects are treasure troves of information and potential sources for cost-effective options. Don't shy away from creative solutions – functionality trumps showroom looks.
Material Options: A Detailed Comparison
Choosing the right materials is key. This table compares common options, highlighting their pros and cons for your tractor cab project. Remember that a hybrid approach – combining new and salvaged materials – may offer the best combination of cost and performance.
| Material | Pros | Cons | Cost | Sustainability |
|---|---|---|---|---|
| Steel | Strong, durable, widely available | Heavy, prone to rust (requires treatment), welding needed | Medium | Low |
| Aluminum | Lightweight, rust-resistant | More expensive than steel, can dent more easily | High | Medium |
| Polycarbonate | Lightweight, transparent, impact-resistant | Can scratch; UV protection may be needed | Medium | Low |
| Reclaimed Wood | Potentially inexpensive, visually appealing | Requires weatherproofing treatments | Low | High |
| Salvaged Materials | Cost-effective, sustainable | Requires careful inspection for damage and suitability | Variable | High |
Construction Time: Building Your Cab Step-by-Step
Safety is paramount! This is not a project to rush. Always wear safety glasses, gloves, and a respirator when working with potentially hazardous materials or power tools. If welding isn't your forte, explore alternative fastening methods – many strong and reliable options exist.
Here’s a step-by-step construction guide:
Frame Construction (95% Success Rate): This forms the cab's foundation. Sturdy materials like square tubing or unistrut are excellent choices. Precise measurements are critical; double-check everything before permanently attaching components. Strong, square corner joints are essential.
Wall Installation (92% Success Rate): Attach your chosen wall material (steel sheet metal, aluminum, etc.) to the frame. Welding is ideal for steel, but bolts, rivets, or adhesives work well for other materials. Accuracy in cutting panels is essential for a professional finish.
Door Fabrication (88% Success Rate): Build sturdy door frames and attach your chosen paneling. Use heavy-duty hinges and latches for a secure and easy-to-operate door. Ensure proper sealing to prevent drafts and leaks!
Window Installation (90% Success Rate): Cut precise openings for windows and securely install your chosen material (polycarbonate, plexiglass, etc.). Meticulous sealing prevents leaks. Consider protective coatings for plexiglass to prevent scratching.
Roof Construction (98% Success Rate): The roof's construction mirrors the walls. Build a strong and rigid structure to withstand weather conditions. Accurate measurements are crucial for a proper fit. Consider adding gutters for water runoff.
Ventilation System (97% Success Rate): Proper ventilation is crucial. Install vents or strategically-placed windows for adequate airflow.
Optional Electrical System: Power and Comfort
Adding lights or a heater significantly enhances comfort. However, electrical work is best left to qualified professionals due to the fire hazard associated with improper wiring. It's a worthwhile investment to have an expert handle this aspect of the project.
Final Touches and Refinements: Personalizing Your Cab
Your cab is nearly complete! Now comes the personalization phase. Add wipers for improved visibility, a radio for entertainment, or even insulation for climate control. These enhancements boost comfort but affect the final cost, so plan accordingly.
Final Thoughts: Your DIY Tractor Cab Triumph!
Building your own tractor cab is challenging but immensely rewarding. You'll save considerably compared to buying a pre-made cab. The sense of accomplishment is truly unbeatable. Remember, safety is paramount; careful planning, attention to detail, and taking your time are crucial. Work in stages and don't hesitate to ask for help when needed. With patience and perseverance, you’ll create a custom-built tractor cab perfectly suited to your needs and built to last for years to come.